One of the reasons why developers love working with TailwindCSS is the ease of customization. Compared to other frameworks like bootstrap and material UI, you can customization anything you want in Tailwind CSS. In this guide, you will know how the base layers of TailwindCSS can be customized with custom styles.
Customizing Base Layer in TailwindCSS
First, you need to understand how all the things work in TailwindCSS. When you add 3 directives in TailwindCSS input file, they are used for different purposes. The @tailwind base is for the default styles of the elements, @tailwind utilities is responsible for all the utility classes and @tailwind components is for the components you may want to add.
To change the base styles, you need to override the existing default styles in the @tailwind base layer. Here is a general syntax of how you can customize any layer in TailwindCSS.
|
1 2 3 4 5 6 7 8 9 10 11 12 13 14 15 16 17 18 19 |
@tailwind base; @tailwind components; @tailwind utilities; @layer base{ /* your custom styles here */ } @layer utilities{ /* your utility classes here */ } @layer components{ /* your components classes here */ } |
Customizing Default Heading Styles in TailwindCSS
In our example, we are going to change the default style of heading elements to something we want according to the project. So, we need to change the @tailwind base layer. Here is an example of how to change heading styles with custom styles in Tailwind CSS.
|
1 2 3 4 5 6 7 8 9 10 11 12 13 14 15 16 17 18 19 20 21 22 23 24 25 26 27 28 29 30 31 32 33 34 35 |
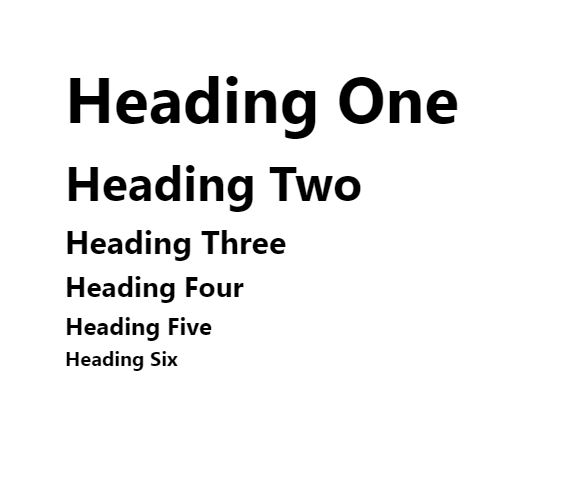
@tailwind base; @tailwind components; @tailwind utilities; @layer base{ h1{ font-size: 64px; font-weight:700; } h2{ font-size: 48px; font-weight:700 } h3{ font-size: 32px; font-weight:700 } h4{ font-size: 28px; font-weight:700 } h5{ font-size: 24px; font-weight:700 } h6{ font-size: 20px; font-weight:700 } } |
Now, whenever you will use your headings, it will look like the following screenshot. You can check the working demo online as well.
Changing Default Style of Input Elements in TailwindCSS
With the above method, you can change the default styles of any element you want. For example, if you are following a design system and you are pretty sure you will use the same input elements everywhere in your project, you can override the default style set by TailwindCSS. Here is an example of changing form element default styles.
|
1 2 3 4 5 6 7 8 9 10 11 12 13 14 15 16 17 18 19 20 21 22 23 |
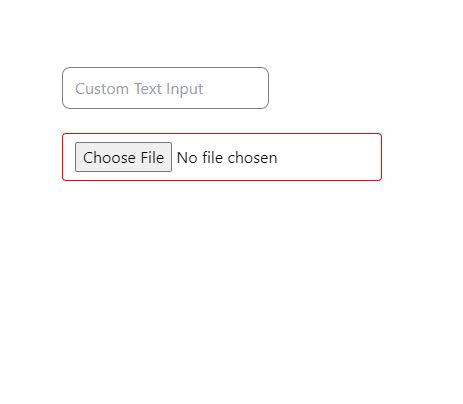
@tailwind base; @tailwind components; @tailwind utilities; @layer base{ input[type="text"]{ border: 1px solid gray; padding: 8px 12px 8px 12px; border-radius: 8px; } input[type="file"]{ border: 1px solid red; padding: 8px 12px 8px 12px; border-radius: 4px; } } |
You can check the above example on the tailwind playground. The output of the code will generate the design below.
Conclusion
You can set the default style of any element by overriding the existing styles set by Tailwind. You need to change the tailwind @base layer if you want to set any default style of HTML elements. Please read more about changing the default styles in TailwindCSS on official documentation for more understanding.
Also, check how to add custom CSS or classes in TailwindCSS.